Showing posts with label Tactics. Show all posts

Sunday, October 9, 2011

Ogre Kingdoms (Slave)Giants: Are they worth it?

Hello, hello, hello. Long time no see, I know, but as always I have been a busy little gamer! As promised, the shiny, new Ogres have been built and have seen some tabletop action against the other races of Warhammer.

But we are here to discuss GIANTS!

My Ogre Kingdoms Giant!
As a leftover from my unsuccessful Orcs and Goblins Waaaagh, my Giant quickly found his place in my Ogre Kingdoms list, even at 1000 pt. games. At first, he was just a giant point-sink - something worth 200 points that allowed me to quickly fill-up a list. Add to the fact that Giants are quick to field, sturdy, easy to transport (no puny, fiddly details, not finecast - just good ole plastic!) and you can see why I decided to include one in my previous army. Heck, the previous sentence is also the reason why I'm playing Ogre Kingdoms in the first place..

So.. what do you get?
Well, for 200 points you get possibly one of the most balanced, well-rounded big, nasty creatures in Warhammer Fantasy. A random table of effects allows a giant to deal with other big monsters either by killing or shutting them down and he excels at stomping on big blocks of guys or holding them in one place until your Ogres get in position for some delicious flank charges. Add to that the benefit of the survivability granted by Lore of the Great Maw and maybe you'll see why a Giant can be a great addition to your army. Lets start with the most obvious reason to use a Giant:

Bullet Magnet:
A Giant is the cheapest big monster that you can add to your list and as such he should be used to taunt your opponent and fish out his artillery, magic missiles and shooting.
Multiple Wounds: In other armies Giants stick like a sore thumb and are surrounded by big blocks of numerous models with only one wound. As such they are usually the first thing to be shot at by cannons, balistas, etc.However, if you do use a Giant in your OK you'll realize that their biggest importance is to be the center of attention. You want cannons to shoot at them and not at your Ogres and Ironguts, because they will go through your models, they will wound them and they WILL cause multiple wounds to your Ogres.
Sure, they have no armor, but what they lack in defense they have in Toughness. With 6 Wounds and Toughness 5, I Giant can and will absorb some shooting. If you manage to get some soft cover from specific terrain pieces, many archer units will hit you on 6's and wound you on 6's. Your biggest weakness will be some of the army-specific magic missiles which hit automatically and have a high Strength.

However, your best augment spells can greatly benefit your giant! Toothcracker adds +1T, making your Giant even harder to wound at T6. However, what truly makes the Ogre Kingdoms Giant is the ability to give him Regeneration. Yep, a 4+ save by casting Trollguts. Hit your lumbering behemoth with that spell and all of a sudden he's getting some awesome resistance against most attacks.
Similarly, casting Toothcracker on your other units will make them T5, thus making them equally hard to kill. What does that mean, then? Well, it will force your opponent to make choices, especially if they are shooting you with S3. All of a sudden your army is tougher to kill and your opponent has to decide what to go for and every time there are decisions to be made there will be mistakes!

Beast Slayer
Giant are great at "tar-pitting" and even slaying your opponents monster, chariots, cavalry, etc.
But before we discuss his arsenal against the big, nasty things.. let me reveal to you what the most important factor is: Initiative 3. That's right. A Giant's most awesome stat when it comes to fighting monster is his average Initiative. Many creatures have lower Initiative than your Giant and in many cases it is vital for him to strike first. Hydras are I 2, Necrosphinxes - I 1, etc. etc. Coincidentally, their low Initiative makes them that much easier to kill. When fighting Big Things you roll on a chart to see what happens. Half of the time you basically shut down your target until the next turn. The other half is a painful thump with club.. 
Yell an Ball - If you roll a 1 on the table for killing Big Things (which affects Monsters, Monstrous Beasts, Monstrous Infantry, Monstrous Cavalry, Chariots, War Machines, etc.) you automatically end the combat and with by 2 points. This is great as a tar-pitting "technique" and will save you against some especially hard-hitting things - like giant blocks of Always Strike Last great weapon-wielders. A lot of the time monsters are stubborn but have low Initiative, so your chances of making your opponent's scary beast to run away are pretty good!
Thump with Club - (2-4) This is the deadliest weapon your Giant has against big things. A failed Initiative test inflicts 2d6 automatic wounds. No armor saves allowed. Remember how I mentioned that many monstrous creatures have piss-poor Initiative? This is when it truly, truly matters. I've killed Hydras and Necrosphinxes without even taking a wound. Yeah, a Necrosphinx has Heroic Killing Blow, T8, S8 (I think) and other nasty surprises, but with an Initiative of 1 that failed test will inflict 7 wounds on average, thus instakilling it. ;D Thump with Club tests against the lowest Initiative in a unit (so a Chariot will have to pass an I2 because of its Cold One or Horse), so that makes it useful against mixed units as well.
'eadbutt: On a 5 or 6, your Giant inflicts an automatic wound on any model in the unit. No armor saves. The model is then "stunned" and if it hasn't attacked this turn it loses all of its attacks. If it has, it loses next turn's attacks. Yet another tar-pit ability useful against things without a Ward save or Regeneration. It will save your skin many, many times!

Suicide Horde-Stomper
Sometimes it is necessary to have one or two units that can dish out enough damage to horde units just to reduce their ranks. At 200 points your Giant is 22 points cheaper than your 6-man Ogre unit with Iron Fists and Full command. Not to mention that he does not have a banner, so when he dies (and he most definitely will), your opponent will only be able to capture his loincloth.
What should you aim for? Obviously lower Strength, lower Initiative blocks of guys - Empire Halberds, pretty much anything Lizardmen, Orcs, Goblins, other Ogres. Going after blocks of Dark Elves is tough, because of Hatred, but you have Terror and if you're lucky their WS will be reduced. Same goes for the other armies - when charged or getting charged don't forget to mention your Terror ability, because a failed Ld check by your opponent will mean you're getting on 5's, rather on 3's or 4's.
Your Ld10 and Stubborn mean you don't care if you get the charge or not. If you use your Giant as a suicide unit you'll be going after other Stubborn regiments.
The trick is that even if you lose, even if you die before using any of your Special Attacks you still have a chance of doing tons of damage by falling on them. Most of the time you'll be hitting around 15+ small models and wound them on 2+ (S6). Also, Multiple Wounds (d3) on bigger things, so multiple wound blocks are also in trouble if your Giant falls on them. And if you somehow survive your epic charge.. well.. that's a bonus, I guess. No matter how badly you lost by you are Ld10 Stubborn, so just don't fail at rolling dice. Oh, and don't roll a 1 after losing.. :P

Wednesday, October 20, 2010

Raider Rush and Jetbikes Revisited.

The new Dark Eldar codex is only a few weeks away, so I figured I would post a basic tactic using and army based around Raiders. For those of you who don't know Raiders are the basic transport for Dark Eldar. While they are very fragile, they are also very good at their job; getting units around quickly. Being open topped not only allows the units inside them to disembark and assault in the same turn, but also allow every model inside to fire. This combination of abilities means that Raider can quite effectively give you the ability to hit your opponent hard before they can hit you. The downside to the raider is that they are extremely fragile, so hitting your opponent first is not only a benefit, but a necessity.

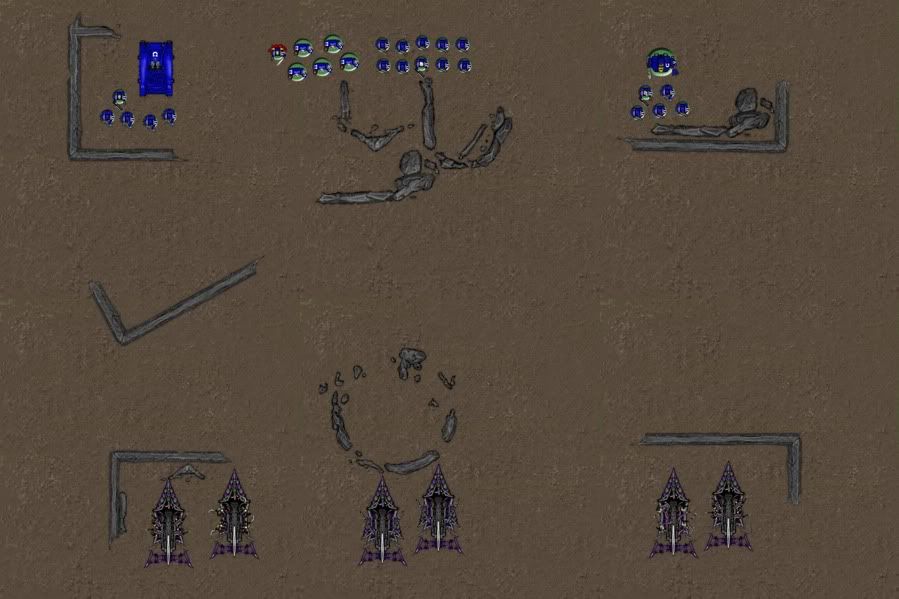
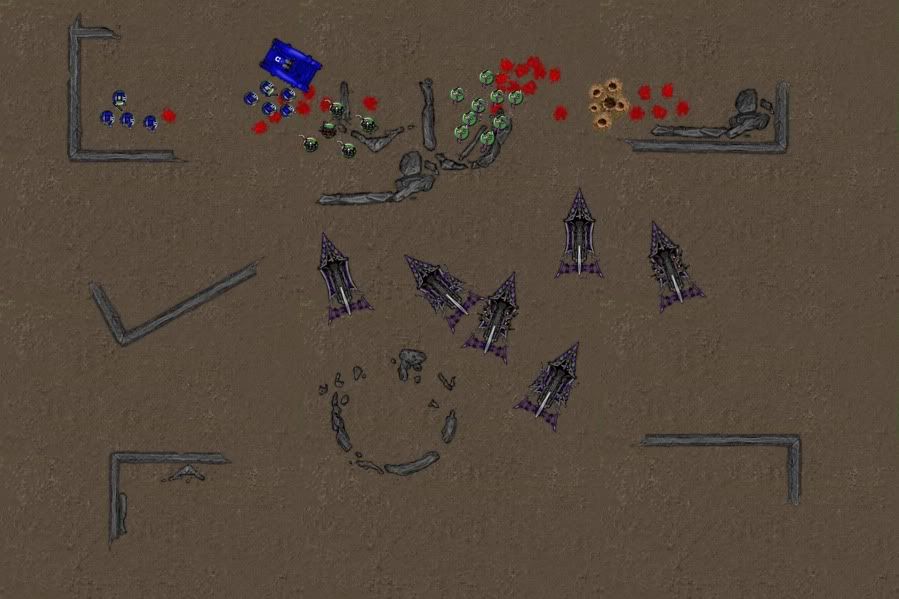
They technique starts in the deployment phase. If you go first (like the game in the example) try to spread your units up into three even sections. On your left and right sides evenly distribute your assault units and shooting units in Raiders. This allows you to maneuver to either side equally well, and makes your intentions harder to read. In the center (if you can) you will place your mobile firebase, either Ravagers in my case, or whatever you prefer. I like disintegrators on Ravagers because they can shoot quite far to support either side of the board. Always place your vehicles in cover, even if you are deploying first, you never know when someone will steal the initiative. If you are going second you have an easier time of deploying, you can see your opponents formations and counter them. Just be sure to deploy out of line of sight where possible.


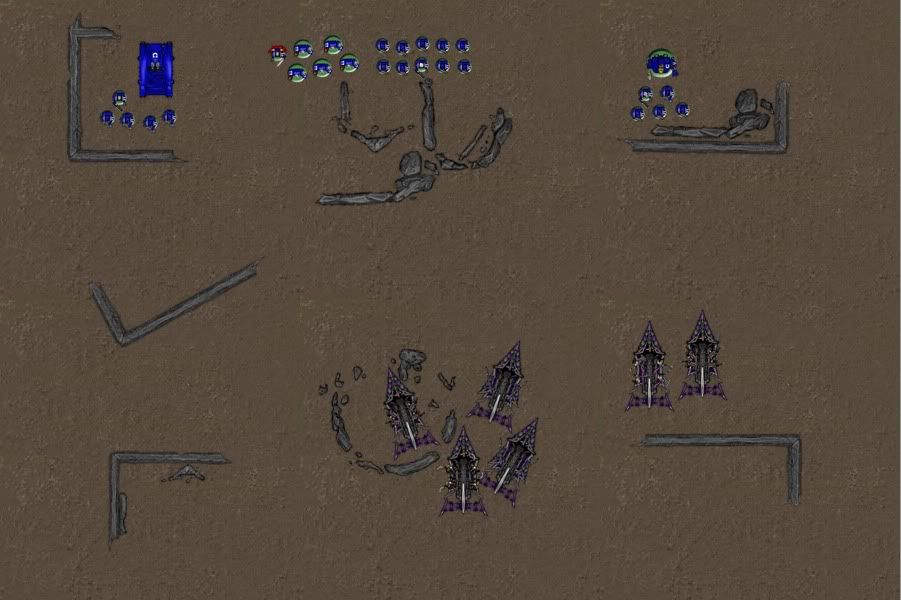
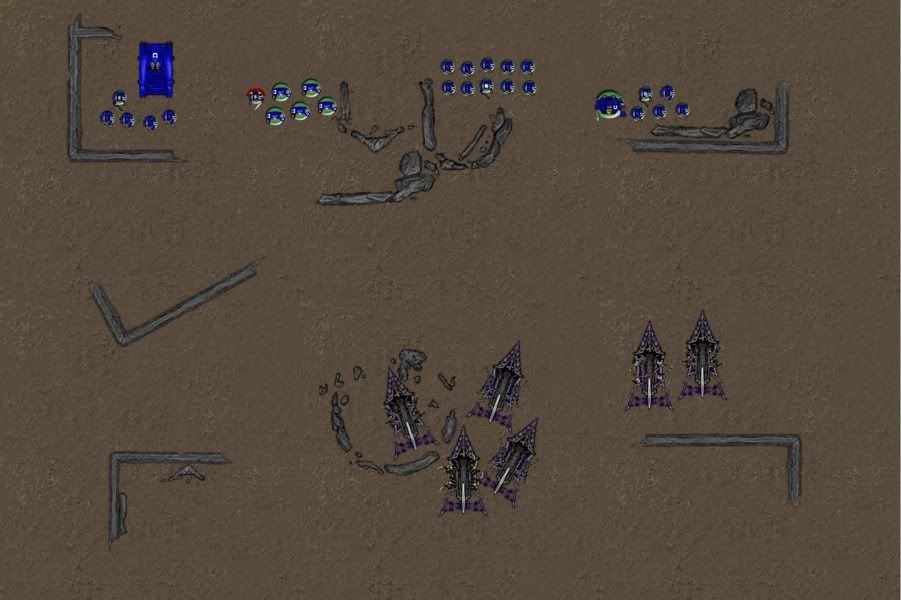
It is now up to you to assess your situation and decide where to attack. Since you are evenly distributed in your deployment zone you should be able to attack anywhere on their side of the board. In this game I saw that my opponent had a Devastator squad in the building to the left, and I wanted to have cover saves against it as long as possible. I also saw that there was a dreadnought on the other side, and I figured I could easily punch through the armor and leave an opening on that side of the board for my Raiders to safely occupy. The cover was also more advantageous for me to go to the right, as there was a lot in the way of those Devastators. Just look at every unit your opponent has and imagine what I like to call their "threat radius," or how far they can attack. Sometimes you want to head toward the units with the longest range because that means their advantage will be lessened, and sometimes this also leaves the short range units too far away to stop you. Move your Raiders on the side your attacking 12" out, if you think you don't need the extra speed or if you really need to fire the dark lances. The other side should make a full 24" move if possible to try and meet the rest of the army. The center firebase should try and soften up units that either can hurt your Raiders or that your units will be attacking next turn. The idea is that on turn two your entire army hits at the same time. This leaves your opponent with nothing to attack you with in the nearby area, so you are only left with a handful of attacks against your fragile units.

Nightshields gave me great protection this turn, and they have really helped in most of my games with the old codex. Flickerfields are an interesting choice in the new book that gives your vehicles a 5+ invulnerable save, but your should really be using cover to your advantage wherever possible (it's free and a 4+). Notice how the only Raiders that are not using cover are the ones that are facing almost all s4 shooting.

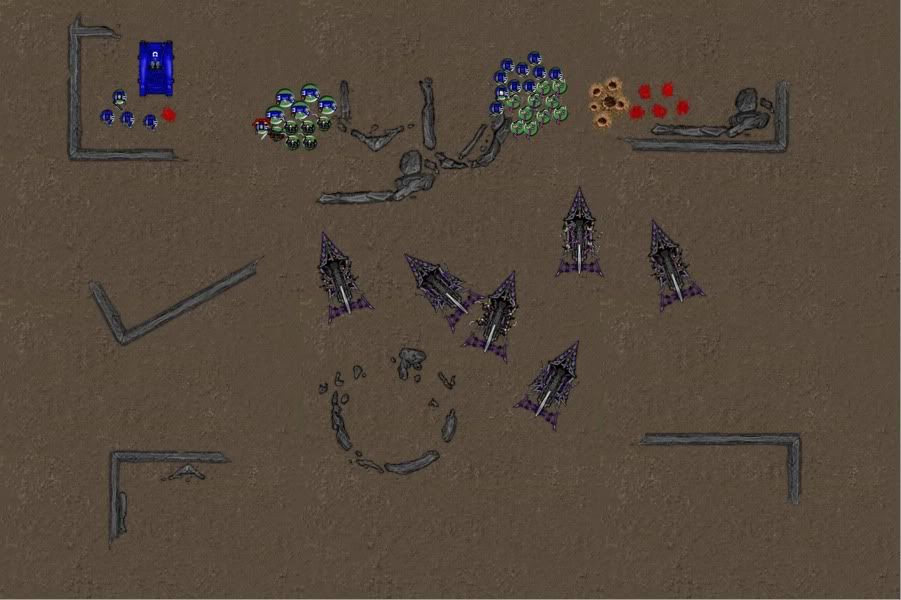
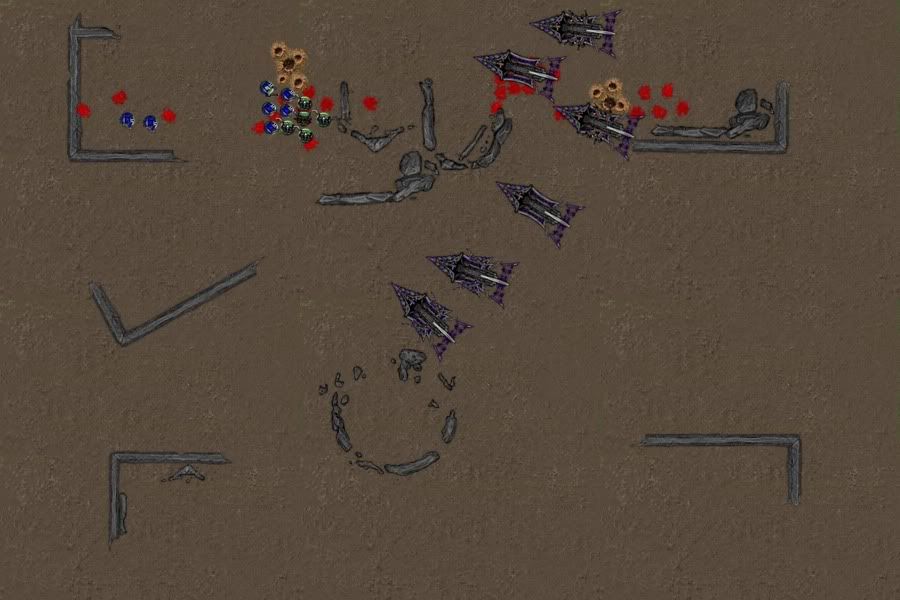
Turn 2 is when almost all your units should be hitting. Move your combat unit transports the full 12" hop out your 3" and get ready. Your Raiders with warriors should try and move only 6" if they can get into rapid-fire range and try and take down small targets or ones with low armor. Fleet and Assault if nessisary for your combat units making sure to pick appropriate targets for each. In this case my Incubi went for the terminators and Captain, while my Wyches attacked a regular tactical squad. My warriors shot down and killed a combat squad with help from a Ravager, and all the raiders combined to finish off the Dreadnought.

After both close combats I tried to consolidate into cover. This is especially important for the Wyches as they only have a 6+ armor save and are real powerhouses as long as you can keep them alive. Some fire will inevitably take down some of your units, but if you are lucky and pulled off the initial move correctly, they should not be much left in range (or in general).

That leaves you turn 3 to either finish up combats or sweep out whatever is left of your opponent. Move your units back into their transports if they are still alive and repeat.

Just be sure that every step of the way to try and keep your Raiders in cover. With only armor 10 they go down even to bolter fire so having that 4+ save helps immensely. Nightshields are your best friend, especially on Ravagers, who can then outshoot heavy bolters safely.

I hope this can get starting Dark Eldar players on their way to victory, as those first few games can sometimes be rough. More advanced tactical guides will follow in the next few days, but despite this being rather basic it works very effectively in most of the games you will probably play. Be sneaky, Dark Eldar don't win by brute strength, always try to outsmart your opponent, and know more about their army then they do. Knowledge is power!


Speaking of knowledge I played a game using the new codex just so I could see how the reworked Reaver Jetbikes perform. After taking them for a spin I am still rather torn. The game was against Tau, and while the swoop attack was great against Kroot who were out in the open because they thought they were far enough away (spearhead deployment) I have a feeling they I won't be facing a squad of Kroot out in the open in every game I play in the future. I ran with a unit of 7, in fact I pretty much just rewrote my old list so the bikes had blasters and a unit leader with an agonizer (no more s5 punisher...). My basic assessment is that they need to be turbo boosting every round to survive. I did everything with them; swooped, shot, and assaulted. Everything was lackluster except for the fly-by swoop attack. I can't see blasters for tank popping being too effective considering the 5+ armor. With blasters being a 1 per 3 jetbike choice it means your unit has to be fairly large to guarantee the vehicle kill, and that becomes cost prohibitive really quickly. In my next game I will try a completely bare 6 man unit with no upgrades whatsoever. Hopefully this will keep their cost down, and make sure they have a set focus of "just being annoying." My plan is to use them to harass small units, soften up targets that I plan to shoot or assault, and to use the 36" turbo-boost to park next to enemy units that are falling back. I can also see them being helpful in a Two-Wave game plan when having all your Raider units hit at once isn't possible.